Tip #8 - Views using WImageList
It appeared to me, while virtually thumbing through my online docs, that although everything necessary for creating a list view was available, it it may not be obvious where to start. Let me preface this by saying: List Views and Tree Views are not hard. Microsoft's Exporer is an example of a Tree View on the left and List View on the right. This week I will focus on List View but the exact same methodology is used for Tree View. For every item in the view, such as a filename or foldername, there is an associated icon.
Continuing with the Explorer example, in the View menu there are 4 options to display the items:
- Large Icons
- Small Icons
- List
- Detail
You may notice that the size of the Icons for Small Icons, List and Detail are the same. They use the same WImageList which I will refer to as the Small Icons.
Power++ allows you to define icons and associate Resource ID's to them through the View Resources. By default, new icons created through the Resource View will be 32x32 icons. If you would like to create 16x16 or 24x24 or even 48x48 icons, start the Image Editor on its own and then ask for a new icon.
In this example, I have created an icon - HAPPY_FACE and I have added two icons from the Component Gallery, MAN_BIG and MAN_SMALL. These icons can be used as either Large Icons or Small Icons, depending on how you add them to the Image List. My scheme for representing items in the list will be like this: When I add an item, I want to represent it with either HAPPY_FACE for both Large Icons and Small Icons or by MAN_BIG for the Large Icons and MAN_SMALL for the Small Icons.
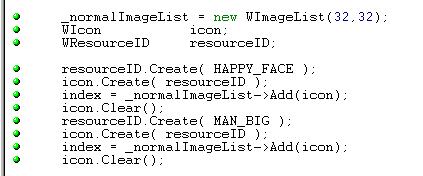
To accomplish this, we need two WImageLists: one for the Large Icons and another for the Small Icons. The code to add the HAPPY_FACE and the MAN_BIG to the ImageList used for Large Icons is shown here. This code was in the Create event for the form and _normalImageList is a member variable of the Form1 class. Relatively the same code will be done for the Small Icon Image List, _smallImageList, with the exception that the Image List will be a WImageList(16,16). To that I would add HAPPY_FACE and MAN_SMALL. I then associated _normalImageList and _smallImageList with the List View like this:
- lv_1->SetImageList( _normalImageList );
- lv_1->SetImageList( _smallImageList, WLVISmall );
Now I am able to Add() an item to the List View and specify, using a zero-based array, which set of icons I want to use. Here I am adding an Item with "The Happy Face" as its description. The HAPPY_FACE icon will be displayed when the List View is in either the Large Icon (normal) state or Small Icon, Detail and List state. This is because when item1 is added, the second parameter is 0 which is the index into both the _normalImageList and the _smallImageList, and the HAPPY_FACE Icon is in that position in both Arrays. Item2 - "The Man" - has a second parameter of 1, which in _normalIconList is MAN_BIG and in _smallIconList is MAN_SMALL.
That's it. You can change the View of the List View with SetView() and supply a predefined constant such as:
- lv_1->SetView( WLVTIcon ); // for Large Icons
- lv_1->SetView( WLVTSmallIcon ); // for Small Icons
In the following weeks I am thinking several topics:
- The State ImageList for Views
- LIB and DLL Targets
- A simple Socket and Server Socket example
- Master Detail Querying ( Using the SetParameter() effectively with WQuery)
If you have a topic idea, send it to droptima(at)watcom.com
Click here to see Tip#9Return to Power++ Home Page.
to top of page
Copyright © 1999 Sybase, Inc. All Rights Reserved.
Privacy Policy
Legal