Tip #12 - Making a Splash!
If you make an application that has a long load time, then you may want to add a splash screen to your application. A program that loads but doesn't display anything for 7-10 seconds may appear poorly coded, regardless of how optimized your loading is. The splash screen gives instant response to the start of the program. There are also some features that you may want to add to your splash screen to give the user even more options, such as the ability to click on the screen to dismiss the splash screen.
I made a trivial application that makes a auto-connection and auto-open to a database. The form will not appear until the database engine has loaded and the query has been made (about 7 seconds…too long). I decided to add a splash screen to my project.
I created a new WForm called SplashForm. In the properties for the form use the following settings for the Style tab:
- Form Type: Popup
- Frame Style: No Border
- Visible is checked
- ToolWindow is checked
All other properties should be unchecked.
Now we need to make a resource out of the bitmap that will be displayed. Open the View Resources window and select the menu File | Add. Find the bitmap that is going to display and select it. It will be given a default name that you may change. I changed my identifier to SPLASH_01.
Now we can add a WPictureBox to the SplashForm. In the properties for the WPictureBox, set the picture to the WBitmap( WResourceID( SPLASH_01 ) ). The picture should then display at design time in the picture box.
You now have all the pieces and now you need to code it.
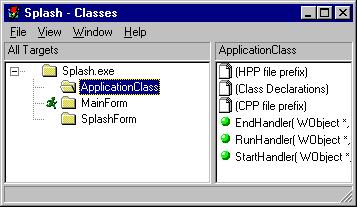
The Application Class
The ApplicationClass class gets instantiated into an object before your main form. The ApplicationClass has three default functions for you to code as seen here:
If you code the StartHandler, that code will be executed before the main form is instantiated. The trick is, in the StartHandler(), to start a new thread and have it process messages independantly of the main form. This thread will be the thread that the SplashForm will run on.Add a new data member to the ApplicationClass as the WThread (you will want it to be public so that the main form can inspect the state of the thread).
- public:
- // add your protected instance data here
- WThread _splashThread;
When we call the Create() method of _splashThread in StartHandler(), we will supply a function in the form WDWord function( void * ); This function will be run on the new Thread. You will need to include "SplashForm.hpp" in the ApplicationClass file.
Use the Class View to add this new User Function to ApplicationClass:

Then in the StartHandler() you simply invoke
- _splashThread.Create(this, (WThreadRoutine) ApplicationClass::OpenSplash, (void *)NULL);
The splash screen will now appear almost immediately after starting the application. Now how do we terminate the splash screen? It should be terminated on one of three events:
- The main form finishes loading
- The user clicks on the splash screen
- after a specified amount of time
The first event is obvious, and the second is just the programmer's preference as to whether the user should be able to terminate the splash screen. The last one is in case a problem occurs with the main application but no error can be displayed because the splash screen is "on top" which is an option that can be set. Lets deal with them in order.
Termination of the Splash Screen
The MainForm Create event
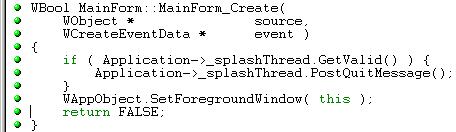
The main form can terminate the splash screen by terminating the thread. We saved the thread as an instance variable of the ApplicationClass. So MainForm simply needs to include "applic.hpp" to get the definition of ApplicationClass and it needs to include "main.hpp" since this is where the pointer to the ApplicationClass object will be found.
You can refer to the ApplicationClass object as Application.
First we check to see that the thread is still valid by calling GetValid(). If it is, then we PostQuitMessage(). Then we set the MainForm to be the form "on top" and should have keyboard input. Notice that SetForegroundWindow() will always be executed no matter which method was used to terminate the splash screen.Clicking on the Splash Screen
The user will actually be clicking on the WPictureBox rather than the form, so I coded the LeftButtonDown event of the WPictureBox. I simply add the two lines:
- SetVisible( FALSE );
- WCurrentThread::PostQuitMessage();
That's it.
Timing Out
Put a WTimer object on your splash form, and set the properties to:
- Running : checked
- Interval : I put 7000 in for a 7 second delay
Then code the Timer event of the WTimer with the exact same code as the Click event above.
Setting the Bitmap Size
You will probably want to dynamically size the SplashForm according to how big the bitmap is. In the Create() event of the form, you can add the following code:
- pictb_1->SetAutoSize( TRUE );
- WRect r = pictb_1->GetRectangle( TRUE );
- SetRectangle( r );
- Center( NULL );
This will resize the Form to the exact size of the bitmap. You now have a fully functioning Splash Screen.
Example Code
Click here to download the Splash.zip example. In this example you will have to have the SQL Anywhere demo database loaded on your system (this helps the application from loading quickly) or take the WTransaction and WQuery objects off the main form or connect them to your own database.
Click here to see Tip#13Return to Power++ Home Page.
to top of page
Copyright © 1999 Sybase, Inc. All Rights Reserved.
Privacy Policy
Legal